
Admin How-To Guide
Add Fitness Activity To The Challenge
Add one or more activities from virtually any criteria to your fitness challenge.
Once a challenge has been created, you must add one or more activities to compete against. You can think of the challenge itself as a container that you invite participants to join and run progress reports against. The activity or activities within the challenge container is where all participant data is collected.
NOTE:This process simply adds activities to a fitness challenge. You will still need to invite users to join your challenge by clicking the Add Participants button after activities have been created.
How To
- Click the Add Activity (plus) button in the Activities panel.
- If you are using the Commercial Edition, you may opt to allow activity trackers to automatically update certain types of participant data throughout the challenge. Click Yes to allow trackers and then select the trackers you will allow (usually all). You will also need to select the activity from the drop down over which your participants will compete. When you are ready, click Next.
- If you elected to use trackers in Step 2 above, some of the caption information will be pre-filled. Otherwise, provide a caption on the
participant page used to capture results for this activity and the type of data to be collected. Be as specific as necessary since this
is how competition data will be recorded by participants. When ready, click Next.
- NOTES:
- If you select Field Type: Multiple Choice, you will be required to input the list of choices and the number of points participants receive for selecting that option.
- You may click the Additional Options link to set the upper and lower bounds for a particular activity. This can be used for data validation and to level the playing field for less fit individuals.
- The Leaderboard Legend option allows you to change the legend displayed on the leaderboard for this activity. By default, the leaderboard legend is the Field Caption.
- By selecting a Texting Number, participants may text in their data for the current date. To use this option, participants are required to enter their mobile number in their Profile.
- If you choose to warn participants of outlier data, the system will send them a warning message if the data they enter falls outside of two standard deviations from the norm.
- Select how data will be entered into the system. You may choose to allow only the admin to enter data, allow participants to enter their own data at any time, or allow participants to enter their own data for a certain number of days. If you choose the last option, you must specify the number of days past the current date they are allowed to enter their data. When you are ready, click Next. NOTE:
- Select how often data can be entered into the system by the participants or admin. The choices are: Daily, Weekly, Monthly, or Once. Daily is by far the most common but Once is useful when a participant can receive credit for a particular action such as: Yearly physical, Submitting an HRA, or attending a lunch and learn. Click Next.
- The ChallengeRunner system is designed to allow multiple activities within a single challenge. By default, your participant will receive one point toward their challenge total for every point recorded for a particular activity. However, in some cases where the activity values vary greatly such as Steps Walked and Pounds Lost, you may want to adjust the points for one activity when compared to others. In these cases, you can multiply the value recorded to account for these differences. Select Default to award one challenge point for every point submitted by a participant for this activity or enter a multiplier in the textbox provided. Click Next.
-
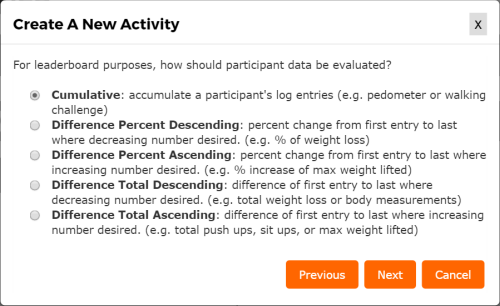
Select how reporting data should be compiled and displayed and click Next.
- The Cumulative option most common and adds all entries together and displays the result in the challenge report.
- The Difference Percent Descending option compares the first value collected with the last value where a lower value is desired and displays the percent change. This is most appropriate for weight loss challenges.
- The Difference Percent Ascending option compares the first value collected with the last value where a higher value is desired and displays the percent change. This is most appropriate for fitness improvement activities such as squats or planking.
- The Difference Total Descending and Ascending options simply displays the difference between the first and last entry collected.
- Select the start and end dates for your this activity. Click the Finish button when ready.
Regardless of the number of days late you select, entering challenge data will not be permitted past the last date of the challenge. This functionality exists to allow the admin to declare a winner immediately after the challenge completes. If you wish to allow additional days to enter data past the challenge end date, use the Extend Entry Days option on the Edit Challenge dialog.
You may now add additional activities to the challenge or invite participants.
<< Prev
Next >>